EN
Translate:
EN


A properly rigged stage or deco bottle will not only be stable on the diver’s body, but will ride in the slipstream, creating much less drag and will be easier to manage. This is especially important when more than one bottle is being carried.
Typically, al80’s are used for stage bottles and al80 (21/35, 35/25), al40 (EAN50 and/or oxygen) and al30’s (oxygen) are used for deco bottles. These instructions will work for any of the previously mentioned tanks.
6 ½’ of 3/16” braided polyester line
2 Stainless boltsnaps – 1” eye and ¾” gate
Stainless steel hose clamp
1’ of 3/8” - 1/2" rubber fuel tubing
18-25” of 5/8” tube webbing (18" for AL40, 25" for AL80)
2” of 1” clear tubing
Motorcycle tubing or bottle straps
MOD marking stickers
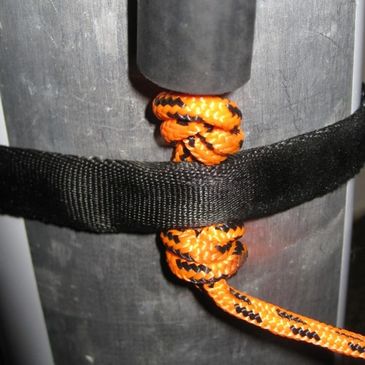
*We've used orange climbing rope and boltsnaps with 1 1/4" eyes for the sake of illustration.
It should be noted that we use rope so we have no metal to metal connections. All connections are cutaway.
Boltsnaps with a 3/4" gate make it easier to clip off the bottle, especially with drygloves in cold water conditions. Like, the 1" eye makes it easier to place a finger in the eye when clipping off, passing a bottle to a teammate or moving it to a leash with drygloves.
Contrary to popular belief, the fuel hose IS NOT a handle. The tank valve is the handle, just as any other tank. The fuel hose “lifts” the stage straps away from the bottle, allowing the diver to get his/her finger or thumb under the strap in order to stow the regulator. Using the fuel hose as a handle does nothing but create slack in the rigging which makes for a unstable bottle. While 3/8” to 5/8" fuel hose works fine, I prefer the 1/2” hose, as it’s easier to use with drygloves.
In the Hogarthian configuration, the deco and stage bottles are all slung on the diver’s left side, clipped off to the left chest D-ring and left hip D-ring. Up to two bottles may be clipped off there. If the diver is carrying more than two deco or stage bottles, the extra bottles will be on a leash.
When being worn, or slung, by the diver, the bottle should face “up” while the diver is in trim. The valve hand wheel should face away from the diver and be on the same plane. This makes turning the valve hand wheel easily accessible.
Fold the line in half, and tie an 18” piece of cave line to the line at the fold. Feed the cave line through the fuel tubing.
Pull the cave line through the tubing so approximately 7 ½” to 8” of the stage bottle line is through the hose.
Adjust the line on the other end so one side is approximately 9” longer than the other
Attach the upper boltsnap by using an overhand knot.
Place the rigging on the tank, over the valve, and around the neck of the tank. Adjust the boltsnap’s position so it lies above the tank’s shoulder, on the crown.

Now that the top has been adjusted properly, remove the rigging from the neck of the tank.
Tie an overhand knot just below the hose. Make sure the knot is tight and that’s it’s as close to the hose as possible, preferably against the hose.
The lower boltsnap should be approximately a palm’s width from the lower knot, which we have yet to tie. Position the boltsnap on the longer piece of line about a palm’s width, plus ~1”. This should put the boltsnap in the proper position when the second knots are tied.
With the longer line, tie an overhand knot approximately ½” below the knot at the base of the fuel tubing. Be sure the shorter section of line runs through the loop of the knot before it’s tightened. Tighten this knot as much as possible. The ½” space is where the hose clamp will be positioned.


Using the other line (previously the shorter line), make a second overhand knot, making sure to make the knot around the loop of line with the bottom boltsnap. This knot, and the prior overhand knot tied in Step 8, will make a fisherman’s knot.
Tighten the second overhand knot against the prior overhand knot, creating a fisherman’s knot. Tie this knot as tight as possible
Cut the excess line and burn the ends, creating a mushroom.
Place the rigging on the bottle, making sure the upper loop goes around the neck of the tank, and not the tank valve. Place the hose clamp on the bottle and into the slot between the knots on the bottom of the rigging, just below the fuel hose. Running tube webbing over the clamp and clear tubing over the hose clamp screw will minimize corrosion. The hose clamp screw should be in line with the valve hand wheel. Pull down on the rigging, so it’s very tight and tighten the hose clamp screw as tight as possible.
Place the upper stage strap over the fuel tubing, at the top of the bottle, near the crown. The lower stage strap goes under the tail, against the lower knot. Inner tube or manufactured elastic stage straps are much preferred over shock cord for ease of gripping when stowing the regulator and its ability to keep the regulator stowed better than shock cord. Note the position of the hose clamp screw, in line with the valve hand wheel.
Your stage or deco bottle is now ready for use. DON'T FORGET TO MARK YOUR BOTTLE! If you haven’t marked your deco bottle yet, refer to the Deco Bottle Marking Page
Proper decompression bottle marking is critical to safe technical diving. Switching to the wrong decompression gas is unacceptable and CAN KILL YOU. To reduce the risk of the diver breathing the wrong decompression gas, the deco bottle must:
During the gas switch process, the diver and his team will reference the MOD sticker on the sides of the bottle.
Since the primary risk the diver has during a gas switch is switching to the wrong gas, resulting in oxygen toxicity, the only marking on the sides of the bottle is the MOD of the gas in that bottle (1.6 PO2 for deco bottles).
For bottles containing EAN50, the bottle would simply have “70” (imperial) or "21" (metric), on each side of the bottle. A deco bottle containing 35/25 will simply have “120” (imperial) or "36" (metric) oriented to the person reading it. The “inside” sticker of the bottle, which the diver will be verifying against, will be oriented to the diver. The “outside” sticker of the bottle, which the team will be verifying, will be oriented to the team.
The exception to the above method of labeling decompression bottles is for bottles containing 100% oxygen. Since the MOD for oxygen is 20fsw / 6m, and “20” can look very similar to “70”, if the diver were to mistakenly switch to oxygen at 70fsw, running a 3.1 PO2, the results would most likely be tragic. Therefore, the oxygen decompression bottle is labeled “OXYGEN 20” (imperial) or "OXYGEN 6" (metric).
Analysis tape is placed on the shoulder of the bottle and lists the bottle's analyzed mix, MOD, date analyzed, bottle pressure and the initials of the analyzer. No additional information is required or needed on the main body of the bottle.
If you wish to have your initials on your bottle, they can be placed on the on the bottom of the bottle, in such a way to not interfere with the MOD markings or cause confusion, as illustrated in the picture to the upper right.
To keep the sides of the bottle clean, the visual inspection sticker is placed on the foot of the tank. The visual inspection sticker serves no purpose to the operation of the dive or the gas switch, so it therefore not needed on the body of the tank.
No other markings or stickers should be placed on the bottle. Doing so could cause unnecessary distraction or confusion during the critical gas switch procedure.
For bottle rigging instructions, see the Bottle Rigging Page

In our configuration, when one or two deco bottles or stages are needed, we wear ("sling") the bottles on our left side (for reasoning behind this, see our blog post "Reasoning for Deco / Stage Bottles on Left"). If more than two bottles are needed, we need another means of carrying the extras bottles, as we can only sling two bottles. Beyond two, it gets too crowded.
The stage / deco bottle leash, often referred to simply as a "leash", allows us to carry as many bottles as needed for the dive, beyond the two on our side.
When carrying multiple bottles, two bottles are slung, and all remaining bottles (up to three) are carried via the leash. If more than five bottles are needed, two leashes are required. The leash is clipped to the left waist D-Ring, along with the deco / stage bottles' tail clips and the SPG. How the bottles are managed, used, and attached is beyond the scope of this tutorial and will be covered by your instructor in your class.
As with everything else, there are multiple ways to make a leash. This method is what I've found to be the most efficient, which is what is important to me on dives requiring multiple bottles.
~24" of 5mm climbing rope
~6-8" of 3/8" tubing (not pictured)
Large SS boltsnap
Lighter
Super glue
Traditional thought / instruction has been that the leash should be about as long as your fist. I've found that to be entirely too short. I prefer to have the bottle(s), when leashed, lay right against my butt, between my legs. A leash the length of my fist won't allow that, and will cause the bottle(s) to "fall over" my left leg, and ride along the left side of my body. This results in a wider profile, more drag and a pain in the ass. I've found that a leash roughly the length of two fists (~6 1/2") is ideal, for me.
Like the stage / deco bottle rigging, I prefer a large boltsnap with an eye ~1 1/4 - 1 1/2" ID. That's large enough for me to put my ring finger in, with gloves, which is key. While some use a double -ender for their leash, I much prefer a boltsnap, to prevent the possibility of the double-ender's trigger from unclipping from the leash
Measure a length of rope so that it is about two fists' length. This will be about the length of your leash. Double the length and add a few inches for the knots.
Cut the tubing ~1/2" shorter than that. This doesn't have to be exact, by any means. The tubing simply gives the leash some rigidity. Slide the tubing over the rope.
Put the rope through the eye of the boltsnap.
Tie a fisherman's knot, so the rope is one loop, the length you measured your two fists.
Cut the ends, burn them with the lighter to prevent fraying, and super glue the knot.


