EN
Translate:
EN

The Hogarthian single tank equipment configuration is a very simple configuration used for shallow, non-overhead, non-technical dives. Due to the smaller volume of gas and lack of redundancy the single tank lacks when compared with the double tank configuration, single tanks are typically used to depths no deeper than 100fsw, with no overhead.
One major advantage of the Hogarthian gear configuration is that it's engineered from the top down. In other words, the same basic gear platform is used when diving a shallow recreational reef dive or while using doubles and multiple stages and/or deco bottles to explore a cave, wreck. Extra equipment is simply added or removed as needed and dictated by the dive objectives.
This equipment platform includes the backplate & wing and a consistent and standardized regulator configuration. While the double tank configuration includes two tanks, two valves and two 1st stages, the regulator configuration of the single tank setup, with a single valve and a single 1st stage is very similar in terms of hose routing.
For example, all regulator hoses are routed over the diver's right shoulder, and the spg, wing inflator and drysuit inflator hose are all positioned on the diver's left side. For a detailed explanation of why the hoses are configured and routed this way, see our Doubles Regulator Configuration Page.
This top-down building block method allows the diver to build muscle memory on the core platform that will translate to all diving environments that they may enter in their future diving, maximizing the enjoyment, safety and efficiency of the dive.
When setting up your single tank regulator, it’s important to keep a few points in mind;
This is designed to provide insight into the Hogarthian single tank regulator configuration and the logic behind the configuration. It's not intended to replace instruction.
When discussing the orientation of the tanks and hoses, we speak in terms of how the tanks are oriented to the diver, while wearing the tanks.
The primary and backup 2nd stage hoses are attached to the right side of the 1st stage, meaning the right side of the 1st stage when the diver is wearing the tank.
The hp (high pressure) SPG (Submersible Pressure Gauge) hose, lpi (low pressure inflator, or wing inflator) hose and drysuit inflator hose or "whip" are attached to the left side of the 1st stage, when worn.
When connecting the hoses, all connections should be slightly tighter than finger tight. Be careful not to use excessive torque when tightening the hose to the 1st stage, 2nd stages or SPG. A slight nudge of a wrench beyond finger tight is plenty.

The primary regulator is the reg the diver breathes from during the dive. It is also the regulator that is donated to an out of gas (OOG) diver. In the event of an out of gas situation, the donor donates the regulator he/she is breathing. This ensures the out of gas diver receives a known working regulator with a gas that is breathable at that depth.
In open water, non-overhead environments, it allows the divers the flexibility to facilitate a side-by-side direct or swimming ascent, or a face-to-face direct ascent, as needed. To enable this, the primary regulator typically has a 5-7' hose (7' for overhead environment) "longhose".
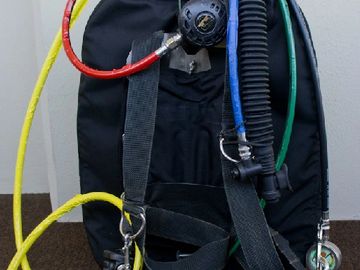
When geared up (pictured below), the diver routes the longhose (illustrated in yellow) from the right side (oriented to the diver, wearing the tank) down behind, under the light canister, around the waist and up across the chest and around the left side of the neck and into the diver’s mouth. The excess of the hose is stowed behind the light canister or, if no canister, tucked into the waist strap or under the knife sheath.
The backup regulator's hose (illustrated in red) is typically 22-24" and is routed over the diver's right shoulder. The length of the backup hose must be long enough to allow the regulator to rest under the diver's chin when not in use and allow enough freedom of movement to fully turn and look to the left when in use. However, if the hose is too long, it will rest over the right chest D-ring, making it difficult to attach or deploy equipment from that D-ring and/or may possibly trap the hose as equipment is attached to the D-ring, over the hose.
The low pressure inflator, or lpi (illustrated in blue), is connected to the left side of the 1st stage and is routed along the corrugated hose via bicycle inner-tube, and connects to the inflator mechanism. The length of the lpi hose will vary depending on the length of the wing’s corrugated hose. The lpi hose length should be such that it's not too long, where it has a large “loop” or wide bend, or “pushes” the corrugated hose down, nor too short, “pulling” the corrugated hose up.
The drysuit hose length (illustrated in green) is as needed so as it does not restrict the diver’s movement, nor does the hose form a “loop” or wide bend causing unnecessary entanglement hazards or clutter. It should be routed from the left side of the 1st stage, under the diver’s left arm and shoulder harness.
The spg is connected to the high pressure (HP) port of the 1st stage. The spg/HP hose (illustrated in black) is typically 24-26”. It must be long enough to allow the spg to sit over the left hip D-ring, but no so long that it bulges out or allows the spg to dangle below the diver.
Now that we've covered each hose individually, let's look at how it functions together
In the picture below:
RIGHT SIDE
LEFT SIDE
Note the clean hose routing. Also note the lack of hose protectors on all hoses. There are no large bends where the hose comes off the 1st stage.
PICTURED LEFT TO RIGHT, BELOW: Right side, left side, front view
In the picture below:
(DIVER'S) RIGHT SIDE
Note how the primary regulator longhose (yellow), is connected to the right side of the 1st stage and routed down, and under the light canister. When geared up, the diver routes the longhose (illustrated in yellow) from the right right side of the 1st stage, under the light canister, around the waist and up across the chest. It then goes over the left shoulder, behind the neck and over his right shoulder and into the diver’s mouth. The excess of the hose is stowed behind the light canister or, if no canister, tucked into the waist strap or under the knife sheath. Some wings' construction may require you to route the hose over or in front of the wing. This keeps the 7' hose clean and tight, with no large loops or bulges. This is also the 2nd stage the diver breathes from during the dive and donates in an OOG emergency.
In the picture below:
(DIVER'S) LEFT SIDE
Note how the lpi/wing inflator hose routes from the left side, along the wing's corrugated hose. It is held in place along the corrugated hose with a bicycle inner tube.
The drysuit inflator hose (silver) routes from the left side, under the diver's left arm and under the left shoulder harness. There are no loops are bulges, keeping the inflator tight and clean under the diver's armpit, eliminating entanglement hazards.
The HP spg hose (black) is routed from the left side and straight down, where the spg is clipped to the diver's left waist d-ring. This keeps the HP hose clean, with no bulges or loops.
In the picture below:
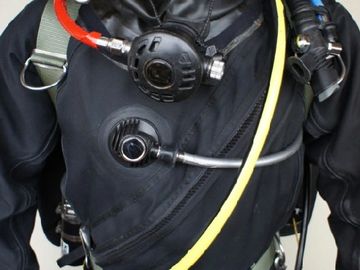
FRONT VIEW
Note the 7' LP primary regulator longhose (yellow) comes from under the light canister across the diver's torso (over the drysuit inflator hose), over his left shoulder, behind his neck and over his right shoulder to the primary 2nd stage. This is the 2nd stage the diver breathes from during the dive and donates in an OOG emergency. Note the diver turning his head to the left, ensuring he has adequate slack to turn his head fully.
Also note the 24" LP backup/secondary regulator hose (red) comes over the diver's right shoulder and is held in place via a bungee'd necklace.
The LP drysuit inflator hose (green) is routed under the diver's left arm and is connected to the drysuit inflator mechanism. Note the importance of connecting the drysuit inflator hose prior to donning the 7' longhose, to avoid "trapping" the longhose under the drysuit hose, preventing full deployment of the longhose to an OOG diver.
The low pressure inflator hose (blue) is connected to the wing's inflator mechanism.
The 24" spg hose is routed behind the diver's left shoulder and is clipped to the left waist d-ring.
The pictures and guidelines above are the typical configurations. The port configuration of the 1st stage may dictate small deviations and some wings' construction may require you to route the hose over or in front of the wing. These modifications will be discussed in your FKD class.
Hopefully this provides an understanding of why the 1st stages and their components are configured and routed the way they are.
For more information on how to dive with the Hogarthian equipment configuration, or team diving, consider our Essentials of Recreational Diving course.
LEFT TO RIGHT, BELOW: Geared up right side view, left side view, front view

The manifolded double tank configuration, often referred to as simply “doubles”, offers the diver a larger gas supply (2 tanks) with the benefit of redundant cylinders and regulators and the capability of having each cylinder work independently of the other, in the case of a catastrophic failure. However, in order to maximize the full advantage that doubles offer, the first stage regulators must be configured properly.
When setting up your doubles regs, it’s important to keep a few points in mind;
This is designed to provide insight into the Hogarthian doubles regulator configuration and the logic behind the configuration. It's not intended to replace instruction nor teach the diver how to dive using double cylinders.
When discussing the orientation of the tanks, we speak in terms of how the tanks are oriented to the diver, while wearing the tanks.
So, the right valve, commonly referred to as the right “post”, is the valve on the diver’s right when wearing the tanks.
The left post is on the diver’s left, when wearing the tanks.
The right post is also referred to as the primary post, meaning the hoses attached to the 1st stage on the right post are the primary life support (2nd stage regulator, or "longhose" reg) and buoyancy control (wing).
The left post is also referred to as the backup, secondary or “roll off” post (due to its ability to be turned off, or “rolled” off when it contacts a ceiling while the diver is moving forward in an overhead). Since this is the backup post, the necklaced backup 2nd stage, drysuit inflation, if no independent drysuit inflation is used, and the submersible pressure gauge (spg) all are connected to the 1st stage on the left post. The drysuit serves as the backup buoyancy control to the wing.
You've probably noticed there is no spg attached to the right post. In the Hogarthian configuration, only one spg is required. It’s connected to the left post, due to the left post's ability to roll off. If the left post is indeed rolled off, the spg’s needle will not move as the tanks’ pressures decrease, alerting the diver that there is an issue with the gas supply (left post closed/rolled off, isolator closed, etc).
As explained above, the right post supplies the primary life support and buoyancy control.
The primary regulator is the reg the diver breathes from during the dive. It's also the regulator that is donated to an out of gas (OOG) diver. In the event of an out of gas situation, the donor donates the regulator he/she is breathing. This ensures the out of gas diver receives a known working regulator that is delivering a gas that is breathable at that depth. In an overhead environment, it allows for single file exits when passing through restrictions. In open water, non-overhead environments, it allows the divers the flexibility to facilitate a side-by-side direct or swimming ascent, or a face-to-face direct ascent, as needed. To enable this, the primary regulator typically has a 5-7' hose (7' for overhead environment) "longhose".
When geared up, the diver routes the longhose (illustrated in yellow) from the right post down behind the wing, under the light canister, around the waist and up across the chest, and around the left side of the neck and into the diver’s mouth. The excess of the hose is stowed behind the light canister or, if no canister, tucked into the waist strap or under the knife sheath. Some wings' construction may require you to route the hose over or in front of the wing.
The low pressure inflator, or lpi (illustrated in blue), hose also is connected to the primary 1st stage, since it’s the diver’s primary means of buoyancy control. The lpi hose is routed behind the diver’s neck, along the corrugated hose, and connects to the inflator mechanism. The length of the lpi hose will vary depending on the length of the wing’s corrugated hose. The lpi hose length should be so that it's not so too long, where it has a large “loop”, or “pushes” the corrugated hose down, nor too short, “pulling” the corrugated hose up.
The left post, being the backup or secondary post, supplies the backup life support, also called the bungeed/necklaced backup, along with the backup/secondary buoyancy control, the drysuit, if no independent drysuit inflation is used, along with the spg.
The backup regulator’s hose (illustrated in red) is typically on a 22-24” hose. The length of the backup hose must be long enough to allow the 2nd stage to rest under the chin when not in use and allow the diver enough freedom of movement to fully turn and look to the left when in use. However, if the hose is too long, it will rest over the right chest d-ring, making it difficult to attach or deploy equipment from that d-ring and/or may possibly trap the hose as equipment is attached to the d-ring, over the hose.
The drysuit hose length (illustrated in silver) is as needed so as it does not restrict the diver’s movement, nor does the hose form a “loop” or wide bend causing unnecessary entanglement hazards or clutter. It should be routed from the left post, under the diver’s left arm and shoulder harness.
The spg is also connected to the high pressure (HP) port of the left post first stage. The spg/HP hose (illustrated in black) is typically 24”. It must be long enough to allow the spg to sit over the left hip D-ring, but no so long that it bulges out or allows the spg to dangle below the diver.
Now that we've covered each post individually, let's take a look at how it functions as a whole.
In the picture below:
RIGHT POST
LEFT POST
The final product is a completely redundant gas supply system, with each post having its own 1st stage, 2nd stage and buoyancy control. Should any of the diver's gear fail for any reason, he has a completely independent cylinder, 1st stage, 2nd stage and buoyancy control, regardless of which post he uses. The identification, management and resolution of failures are beyond the scope of this article and will be discussed and addressed in your FKD technical training.
Note that all hoses are routed "down", not only allowing the diver full access to the valve and isolator handwheels, but also preventing any unnecessary entrapment hazards. Also note the lack of hose protectors on all hoses.
PICTURED LEFT TO RIGHT, BELOW: Right post, left post, front view
In this picture:
RIGHT POST
Note how the primary regulator longhose (yellow), is routed from the right/primary post, down behind the wing and forward under the light canister. It then comes up across the diver's stomach and chest and over his left shoulder, behind his neck and over his right shoulder to the primary 2nd stage. This keeps the 7' hose clean and tight, with no large loops or bulges. This is also the 2nd stage the diver breathes from during the dive and donates in an OOG emergency.
Also note how the backup regulator's hose (red) is routed behind the diver's neck and over his right shoulder. Remember, the backup/necklaced 2nd stage comes from the left/backup post. However, the hose and 2nd stage is still routed over the diver's right shoulder, to maintain consistency in how the hoses and 2nd stages are routed.
As shown in the illustration, there are no hoses routed "up" from the 1st stage. All hoses are routed down. As addressed earlier, this gives the diver full access to the valve and isolator hand wheels, and also prevents the hoses from damaging, or being being damaged by, a cave or a wreck. It also eliminates an unnecessary entrapment hazard by providing cleaner hose routing.
In the picture below:
LEFT POST
Note how the drysuit inflator hose (silver) routes from the left/backup post, under the diver's left arm and under the left shoulder harness. There are no loops are bulges, keeping the inflator tight and clean under the diver's armpit, eliminating entanglement hazards.
The HP spg hose (black) is routed from the left post and straight down, where the spg is clipped to the diver's left waist d-ring. This keeps the HP hose clean, with no bulges or loops.
Also note how the 7' LP primary regulator longhose (yellow) is routed across the diver's stomach and up across his chest toward his left shoulder. If no light canister is used, the 7' longhose can be routed under the knife sheath or simply tucked into the harness' waist strap.
In the picture below:
Note the 7' LP primary regulator longhose (yellow) comes from under the light canister across the diver's torso (over the drysuit inflator hose), over his left shoulder, behind his neck and over his right shoulder to the primary 2nd stage. This is the 2nd stage the diver breathes from during the dive and donates in an OOG emergency.
Also note the 22" LP backup/secondary regulator hose (red) comes over the diver's right shoulder and is held in place via a bungee'd necklace.
The LP drysuit inflator hose (silver) is routed under the diver's left arm and is connected to the drysuit inflator mechanism. Note the importance of connecting the drysuit inflator hose prior to donning the 7' longhose, to avoid "trapping" the longhose under the drysuit hose, preventing full deployment of the longhose to an OOG diver.
The low pressure inflator hose (blue) is connected to the wing's inflator mechanism.
The 24" HP spg hose is routed behind the diver's left shoulder and is clipped to the left waist d-ring.
PICTURED LEFT TO RIGHT, BELOW: Geared up right side view, left side view, front view
The 1st stages pictured below are standard non-swivel diaphragm 1st stages. Other 1st stages on the market may have swivel turrets and/or a "5th port". 5th port 1st stages have a 5th LP port (as opposed to the normal 4 LP ports on most 1st stages), usually located on the endcap of the 1st stage. The 5th post provides for very clean hose routing as it allows the lpi hose and the backup regulator's LP hose to route more straight than on a traditional 4 port 1st stage.
In this picture:
RIGHT POST
Note the lpi hose (blue) comes from the 5th port located on the endcap of the 1st stage. This allows the lpi hose to route straight from the 1st stage and along the corrugated hose. Since the lpi hose is routed straight from the 1st stage endcap, you may find that a slightly shorter (1-2") lpi hose is needed.
In this picture:
LEFT POST
Note the 22" LP backup/secondary regulator hose (red) is routed from the 5th port on the endcap of the 1st stage. This allows the hose to route straight behind the diver's neck, and over his right shoulder.
In this picture:
RIGHT POST
LEFT POST
The pictures and guidelines above are the typical configurations. The wing's elbow placement or the port configuration of the 1st stage may dictate small deviations (such as the backup LP hose routing over the wing's corrugated hose, as opposed to under, or lpi over or under the backup LP hose, etc). These option and modifications will be discussed in your FKD class.
However, hopefully this provides an understanding of why the 1st stages and their components are configured and routed the way they are.
Please note that the hoses are colored for illustration purposes only. We don't color hoses or regulators. To read why, check out our blog post, Why We Don't Color Code.
For more information on how to dive with double cylinders, possible failures and the identification, management and solutions for those failures, consider our Doubles Mini or Essentials of Technical Diving course.
Not quite ready for doubles? Check out our Single Tank Regulator Configuration
PICTURED LEFT TO RIGHT, BELOW: 5 port 1st stages - right post, left post, front view
The Hogarthian regulator configuration uses a standard set of hose lengths, for simplicity and standardization.
The standard hose lengths are ideal, when properly routed, in that they lay close the diver's body, without taking large "bends" creating a messy, non-streamlined profile (and entanglement in overhead), but aren't so tight that they cannot be manipulated or routed properly.
For instance, the SPG hose should be just long enough to clip it off to your left hip D-ring. Anything longer than that and the HP hose will take a wide bend away from the diver's body, which will get in the way of stage/deco bottles and will be an annoyance in an overhead, in addition to possibly damaging the overhead environment. 26" for single tank and 24" for doubles are perfect for almost all divers up to 6'2" or so. Note the single tank SPG hose is ~2" than the doubles. This is because the single tank 1st stage is "centered" on the diver, where the HP hose on double tanks is connected to the left 1st stage, which is on the diver's left side, a bit closer to the diver's left hip D-ring.
Likewise, the backup/necklace should be short enough that it stays close to the diver's neck, rests on the right shoulder, and sits below the divers chin. If the hose is too long, the 2nd stage will lay to theleft of the diver's chin, or the hose will take a wide bend over the diver's shoulder, sometimes "falling" over the diver's shoulder, laying next to the outer deltoid. 22 -24" for single tank and 24" for doubles is the ideal length for most divers. A good way to determine proper backup/necklace hose length is to don your gear, include exposure protection and hood. Put the backup regulator in your mouth and turn to your left. You should be able to turn your head all the way to the left, without your regulator/hose preventing you doing so.
For hose routing, see our Single Tank Hose Routing, Doubles Regulator Configuration or Deco/Stage Regulator tutorials.


Some considerations with hoses:
The hose lengths listed on the table are ideal lengths, when routed properly. Their may be a bit of deviation necessary due to the positioning of the hose ports on the 1st stage, or the diver's physique (specifically, the torso length for the HP/SPG hose), but there shouldn't be much more than a 1-2" variation from the lengths listed on the table above, and any deviation should be kept to a minimum.
Standardization works very well for exploration or large projects, where "next gear up" is a necessity. Meaning, if a piece of gear fails, such as a hose, standardization allows for quick replacement of the failed hose with a new hose of the same length, allowing the project to continue with very little interruption or delay.

In the Hogarthian configuration, the stage and deco bottles are worn on the left side. For the reasoning why they're worn on the left side, see our Blog - Reasoning for Deco/Stage Bottles on Left
This page illustrates how to configure your stage or deco reg in the Hogarthian configuration.
This is designed to provide insight into the Hogarthian deco/stage regulator configuration and the logic behind the configuration. It's not intended to replace instruction nor teach the diver how to dive using a stage or deco bottle.
Additionally, hoses are colored for illustration only. We don't color code hoses or regulators. To read why, check out our blog post Why We Don't Color Code.
Start by orienting your 1st stage on your bottle. You want to ensure that a HP port is facing "down" when the bottle is standing up. Typically, the LP ports are oriented on the handwheel side, as that is the side of the bottle rigging that the LP hose will be routed.
Install the LP hose by screwing the hose into one the LP ports on the 1st stage. On a swivel turret 1st stage (pictured) , the LP port you use on on the 1st stage isn't important, as the 1st stage can swivel to a position to correctly stow and route the regulator hose.
In fixed, non-swivel 1st stages, the LP port you use is more critical. You'll want to use the LP port that is most similary positioned like the picture below (in other words, facing down and slightly forward, when the tank is standing).
Note the swivel/LP side of the 1st stage is on the same side as the valve handwheel. When worn, and not in use, the regulator/LP hose (yellow) is routed along the left side of the stage kit.
The length of the LP/regulator hose is determined by the type of 1st stage being used. Generally speaking, a swivel turret 1st stage will use a 36" LP/regulator hose and a non-swivel 1st stage requires a 40" LP/regulator hose.
*It should be noted that while a yellow LP hose is being used in the illustrations, hose color and/or 2nd stage faceplate color is not important in the Hogarthian configuration, since we don't confirm our gas by color of the hose or 2nd stage. Therefore, any color hose or 2nd stage is acceptable.
Since, by design and it's name states, the swivel 1st stage can swivel, allowing the diver to swivel the turret so the hose is routed correctly when in use, 36" is all that is needed. More importantly, should the diver need to donate his regulator while breathing off the stage or deco reg, the 1st stage can swivel to orient the hose so it's more optimally oriented to the receiver.
Conversely, on a non-swivel 1st stage, all LP ports are in a fixed position. Since the diver cannot change the position of the LP port, the hose must be long enough to not only route correctly while in use by the diver, but must also be long enough to donate. Thus, a 40" LP hose is used on non-swivel 1st stages.
Install the spg by screwing the 6" HP hose into the HP port on the "bottom" of the 1st stage.
The spg is on a 6" HP instead of a standard 24" HP for several reasons. First, if the spg was on a 24" hose, it'd need to be clipped off or stowed. If clipped off, there'd be 2 spg's clipped to the diver's left hip D-ring. This is not preferred, as the diver would have to determine which spg he needed to check when checking his gas, in addition to adding another item to an already "busy" D-ring, and checking the wrong SPG could be disastrous.
It also makes bottle passing more difficult, adding another step to the process in a situation where the diver is likely under some degree of stress.
If the 24" HP hose were stowed similar to the 2nd stage hose, it'd be at risk of coming out when deploying the 2nd stage, causing an unnecessary dangling hose that can become tangled in other hoses, impede regulator donation, or become entangled in line or the environment.
The SPG is also a very important component of the critical gas switching verification process, a time when the diver's left hand is not available to access an SPG that is clipped off.
The 6" HP hose places the SPG up near the 1st stage, making it a much cleaner rig, also making it much easier for the diver to monitor his gas (hands free), especially when scootering with multiple bottles and drygloves..
In the picture, the SPG and HP hose are installed on the 1st stage. However, the SPG is hanging down, and when slung, can't be seen hands free and will be difficult to access. We want the SPG to be up near the 1st stage.
To accomplish this, make a loop of bungee, approximately 1" in diameter. Burn the ends, and you may want to put a couple of drops of SuperGlue on the knot as well.
Now bend the 6" HP hose so the SPG is oriented up near the 1st stage. Slide the bungee loop over the HP hose, and to the base of the hose fittings where they meet the 1st stage and SPG.
This will hold the SPG at the 1st stage, where it's easily seen by the dive, hands free.
Your deco/stage reg is now ready for use.
In the picture, note the LP/regulator hose routes along the left side of the stage kit.
Also note the SPG positioned at the 1st stage. This allows the diver to constantly monitor the bottle's pressure handsfree, with no SPG to unclip.
Need to rig your deco/stage bottle? See our Stage/Deco Bottle Rigging Page.
Don't forget to mark your bottle
PICTURED BELOW, LEFT TO RIGHT: Bungee loop, SPG orientation, fully assembled